Wednesday, September 25, 2013

Addicted to Vintage Sewing Machines

In case you haven't noticed in my past posts, I do most of my sewing on 2 vintage sewing machines; a treadle sewing machine and a hand crank sewing machine! I love these machines so much. They are not only work horses that can sew through anything but they are absolutely beautiful to look at as I sit and sew seam after seam.


I like to sit and wonder about all the items that they may have sewn in their previous lives. I also love that they use my own movement to sew . . . makes my finished items feel even more handmade. The greatest bonus is that you can buy these machines for a fraction of the cost of a new machine and it will last far beyond your living years! Needless to say, I am addicted to my vintage machines.


So my project from last week should come as no surprise. I found a vanity stool at the Goodwill months ago for $3.99 that looked like it would be the perfect height for at my treadle machine. Sure enough, I was right and I have sat comfortably in it, month after month, for 3-4 months now. I finally took a long enough break from sewing to refinish the stool to fit in better with my decor. 


First things first, I removed the seat and dragged the stool outside for some primer and black matte spray paint so that the legs of the stool would match the legs of the treadle table.


Then I removed the faux leather fabric from the seat and re-upholstered it using one of my favorite cotton prints from Robert Kaufman's Vintage Couturier line. To protect it I added a top upholstery layer of some lightweight vinyl (I have a toddler in my house and I refuse to be devastated by chocolate stains)!


And I was left with the perfect sewing seat!


I also began a project for myself this week. I read somewhere that a quilter would create a quilt for herself every year for her birthday and I thought to myself, what a great idea! I spend nearly 365 days a year crafting and quilting for others, it is time to create for myself. My birthday is just around the corner so I decided that I would give myself the gift of a warm quilt for this winter. I began by picking the fabric combination this past weekend. 


I also cut all my pieces over the weekend. I had just enough fabric, except for the solid purple (I am anxiously waiting for more to arrive). I am using a free pattern I found from Timeless Treasures called Eden.


Over the last 3 days I was able to start piecing, I got through 6 of the large squares and some strip piecing to create 3 inch diamonds. 


Last night I finished cutting out the last of 120 diamonds from my strip pieces. 


I cannot wait to see how this quilt turns out! I am thinking I may have to name this quilt, "Vintage Addiction"! 

It is about time to begin Halloween costumes too, so this next week will be a little more work on the quilt and a lot more work on costumes! 

Happy Quilting!

Friday, September 13, 2013

DIY Quilt Block/Applique Envelopes


I was watching Martha's Sewing Room on PBS when one of her guests showed viewer's how to create an envelope to keep quilt blocks and applique pieces in to keep them from getting bent and wrinkled. In fact, the entire episode is available on her website. I watched and followed along and completed an envelope of my own . . . but then I decided it needed some changes.


The Original Design:

1. Cut 2 pieces of fabric 15 1/4 inches by the width of the fabric.


2. Place fabric right sides together and stitch around 3 sides leaving one 15 1/4 inch side open.


3. Turn the fabric right sides out. 


4. Cut 2 squares out of foam board to fit inside your sleeve. Mine were 14 1/8 inches around and I used foam poster board from the dollar store!


5. Take one foam board square and slide into the fabric sleeve you created. Slide it all the way to the bottom.


6. Stitch along the edge of the foam board to hold it in place and add another stitch a half inch from the edge of the foam board. 


7. Insert the second foam board into the fabric sleeve until it reaches the stitches you last added. 

8. Once again, stitch up against the foam board and also a half inch away from the foam board. 

9. Fold the raw edges of your fabric in about a half inch to one inch and top stitch to seal your sleeve shut. 


10. Fold everything up to form the folder. And that is it! Easy as pie!


But I thought that a few improvements could be made. For one, I always keep my directions close to my quilt blocks so a pocket would be a great place to keep them! Plus, with a toddler running around pulling everything out, I could use a block envelope that stays closed in case of being tossed across the room. A tie would be the perfect solution. So here are the directions for my quilt block envelope!

Seams Sew Precious' Quilt Block Envelope:

1. Cut 2 pieces of fabric 15 1/4 inches by the width of fabric. Cut 1 piece of fabric 6 inches by 14 inches. Also pick a matching spool of ribbon.


2. Lay out your ribbon over your outer fabric so that it extends about 8 inches past each end of your fabric. Pin in place and begin sewing the ribbon about 13 inches from the back end of your fabric. 


3. Sew ribbon up until a few inches before the selvage end of the fabric. 


4. When you finish attaching the ribbon pin the ends of the ribbon into the middle of the fabric so that they will not be in the way when piecing the envelope together. 

5. Sew down the edges of the pocket rectangle and then attach it to the inside fabric. Be sure to sew it in on the side of the fabric that will be the bottom of your fabric sleeve.


6. Now place your two pieces of fabric right sides together and sew around 3 of the edges leaving one 15 1/4 inch end open.


7. Turn your fabric sleeve right sides out. 


Unpin the ribbons. Then you will go about inserting the foam pieces just as you would in the above example (steps 5-10 in the above instructions).

8. Cut 2 squares out of foam board to fit inside your sleeve. Mine were 14 1/8 inches around.

9. Take one foam board square and slide into the fabric sleeve you created. Slide it all the way to the bottom.

10. Stitch along the edge of the foam board to hold it in place and add another stitch a half inch from the edge of the foam board. 

11. Insert the second foam board into the fabric sleeve until it reaches the stitches you last added.

12. Once again, stitch up against the foam board and also a half inch away from the foam board.

13. Fold the raw edges of your fabric in about a half inch to one inch and top stitch to seal your sleeve shut.

14. Fold everything up to form the folder and tie a cute bow. And that is it! This version is also easy as pie!


It holds quilt blocks and instructions perfectly!


I should also note, I chose to use flannel on the inside because I figured it may also help hold everything in place just a little bit better!


Now to get sewing so I can start filling my envelopes with blocks! :) 

Happy Quilting!

Sunday, September 8, 2013

A Very Special Anniversary Quilt

We have had a very hectic week in our house as we have celebrated my little one's birthday and our anniversary in the same week. Things have finally quieted down around here which means I can share with you my very special quilt that I created for my husband. Remember that bag of fabric I showed you?


You know, the one that got turned into this . . . 


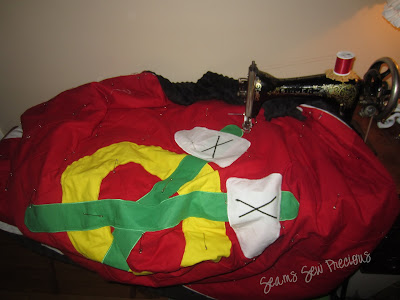
Well, I continued to expand on it until it became just what I had envisioned . . . a warm and cozy quilt perfect for the ultimate hockey fan! 
My Original Sketch

My first step after completing the piecing was to play with dresdens again. I created two fans made of 4 dresdens each.


I then laid and pinned the dresdens onto opposite corners of the quilt. 


Now normally I thread sketch or satin stitch my design onto dresdens to create a feathered look but I decided I wanted something a little more bold and different. I dug through my stash of supplies and found some leftover yarn.


I sketched my designs onto the dresdens and began sewing the yarn over my sketches using a zig zag stitch.


It was just the pop that the quilt needed and added a hint of texture to the quilt front.


After I finished all of the dresdens, I appliqued the center design onto the quilt using a satin stitch and then echo quilted around the center design once to help make it stand out.


I then quilted the rest of the quilt top using basic straight line stitching (I wanted to keep the design feeling strong and masculine) and stitched my black binding all around the front of the quilt. Then I took to the couch to hand sew the binding to the back of the quilt. When I began hand stitching the binding down I found myself wishing that I had a bag of Wonder Clips to help hold everything down and then an idea struck me!


A pack of Dollar Store bobby pins that I had on hand worked perfectly for holding down the binding. And thank goodness I finished the quilt just in time . . . just hours before my husband got home from work on our anniversary! Phew . . . talk about cutting it close!


The next day I made one more gift for my husband. I took the dress that I wore to our homecoming dance in high school and an old jersey to create the perfect pillow to accompany his quilt. 

The satin from the bottom of the dress was perfect for creating a soft backing for the back of the pillow.


I think I will have one warm and happy Blackhawks fan this season! :)

Happy Quilting!