Sunday, July 28, 2013

Minion Fever: My Stuffed Plush Creation

Despite having a very busy weekend, I was able to accomplish one very important task that I had on my to-do list. My household has had minion fever since the announcement of Despicable Me 2 and this weekend I finally created a stuffed minion for my son.


I began by cutting two ovals out of some yellow minky fabric. I cut them wider than I wanted the finished minion to be because I didn't want him to turn out looking like a yellow hot dog. I then attached denim in an overall shape to the bottom half of each oval.


Then I created a minion sized pocket for the front of the overalls, attached a black felt circle to it and then sewed it onto one of the ovals. At the same time I created 4 thin strips of denim to use as overall straps and sewed them onto the yellow ovals.


I then created a red felt mouth and sewed it onto the same oval that had the pocket. For fun I added some little white teeth. I also created tubes out of some yellow minky and attached them to the same oval. 


I sewed little 3 fingered hands out of black felt and created rectangular cuffs to accompany them. I stuffed the yellow tubes and sewed them shut as close to the edge as possible. 

I then attached the gloves to the seam edges of the arm and used the cuff to cover the awkward joint. I found some fun googly eyes in my stash of craft goodies and marked their size on my minions face. I then cut out some small pieces of yellow minky and pinned them down accordingly to create eye lids for my minion. I also sewed these as close to the edge as possible.


I then slipped the googly eyes into the eyelids and reinforced them with a bit of hot glue on the back!


Unfortunately, I forgot to take pictures of how I created his legs and shoes. But I crafted a pair of black boots out of felt and used cardboard inserted in the bottom to help keep a flat bottom to his foot. I then created some tubes out of denim to make his legs and attached these to the boots. I stuffed the shoes and legs and then sewed them to the bottom of the front oval. Once this was done I pinned the back oval to the front with right sides together and sewed around leaving an opening at the top of his head. Don't worry, all his limbs are there, I tucked them in before sewing!


I turned him right sides out, stuffed him and hand stitched his head together.


I then cut a thin rectangle of yellow minky and 5 pieces of black yarn. I knotted the yarn in the middle and hand stitched it between the rectangle and his head. The rectangle covered the knots and made it appear as though the yarn was growing out of his head! Again, I forgot to photograph my progress . . . so sorry.  

I created goggles by cutting two small circles off of an empty toilet paper roll. I padded them with some batting and wrapped grey fleece around them. I sewed them together in the middle. I hand stitched the black band around the minion's head and then hand sewed the goggles into place over his eyes. Once the goggles were in place we had the perfect minion! Soft enough to cuddle all night long!


Too cute, right?


This week I will return to some quilting that is next on my to-do list! Happy Quilting!

Monday, July 22, 2013

A Thrifty Weekend

I got to spend some much needed girl time with my mom this weekend as we went on a thrifting adventure! We headed south of our area to hit some thrift stores that we haven't been to. And wouldn't you know it, there was a lot more sewing related items then I typically find at our thrift stores. 


I very rarely find fabric in our area, but there was lots to choose from at the Savers that we stopped at. I picked just a few of the fabrics that struck my fancy. Can't beat getting so much fabric for so cheap. I already have a few projects in mind. 


I also found a wooden sewing box at a Goodwill that we stopped at. I have been looking for one of these for a long time now! I had found one months ago at a flea market but the gentleman selling it had wanted $20 for it and would not budge on his price. Now I was able to find one for $2.99!!! It is slightly damaged but, I don't mind. That means I can refinish it without feeling guilty!


There was also a very unique box sitting at another Goodwill along our route that was just too pretty to pass up. It looked like it would make a very unique sewing box so, of course, I snatched it up. After all, I keep hand sewing supplies all over in case I feel like getting crafty so I love having unique boxes to hide everything in.


I think I really fell in love with the beautiful little feet on the box. 


I also loved that the inside was lined and was clean!!!


The final sewing supply I picked up was a bag of polyfil for $1.99! I will be using it to make a stuffed minion for my son.


The only other sewing related items I found were some dresses for altering (although I may not mess with the yellow and white one). 


Certainly cannot beat 89 cents as a price! Hope everyone had a wonderful weekend. Time to get back to quilting this week.

Happy Quilting!

Saturday, July 20, 2013

A Little Off Topic Sewing and a Little Quilting

I've been keeping very busy at the sewing machine this week. But it hasn't all been quilting. Over the past couple of days I have been fixing up some dresses that I purchased from the thrift store. One is a rather embarrassing story. I found a dress that I loved, it had a cute summery country vibe. I snatched it up excitedly when I saw it was a size medium.


Cute, right? Will even look adorable with a jean jacket and boots in the fall. I washed it and was ready to wear it asap. Only, when I went to put it on I couldn't even get it over my arms. What??? Could I possibly have outgrown a medium? I didn't think I had gained much weight! I took it off and double checked the tag.


Oh my! That explains it. Turns out I should be wearing my reading glasses when I read. Imagine that! I couldn't just give up on this adorable dress. I had to make it work. So, out came the dreaded seam ripper. My plan: attack the side seams.


Ahhhh, some breathing room! The side with the zipper was a blast to seam rip (I hope you are sensing my sarcasm). But once both sides were draped open I went to the cutting mat with a matching cotton fabric and matching lace overlay. I cut out some rectangles to insert into the dress.


Then some pinning, and some sewing.


And some more pinning and sewing. 


I slipped it over my head and sweet relief, it fit like a glove! 


I even wore it today for some thrifting at an estate sale. Unfortunately, there was no quilting fabric but I did get a box of flowers for decorating for only $2! 

Last night I began work on what will be my biggest quilt: a quilt for our king sized bed. Not too long ago we had re-done our bedroom but I have yet to share pictures because I haven't created a comforter to match. I chose the Ginger Belle pattern from Miss Rosie's Spice of Life Quilts. 

Here is a sneak peak of the colors I chose:


Last night I began doing some of the smaller piecing on my hand crank sewing machine. 


All I got through were the hourglass pieces but I am very excited already to see how my blue bird quilt will turn out! :)


More to come soon I promise! Happy Quilting!

Tuesday, July 16, 2013

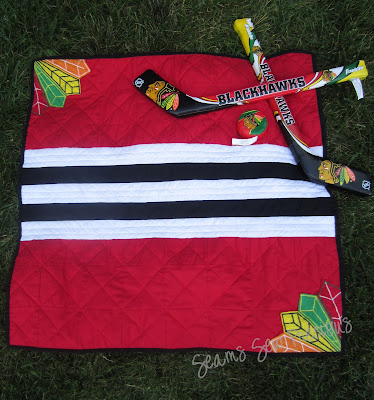
Hockey Themed Baby Quilt


When my next door neighbors, who happen to be as big of Chicago Blackhawks fans as us, told us that they were expecting I had a feeling I would be creating a hockey quilt for them. As the 9 months have passed, I decided I want to go one step further and create a Chicago Blackhawks themed quilt for their future bundle of joy. I think this quilt may have been the most fun to create since I created my own pattern. I began by sketching a design that I wanted.


I pieced the top and then created my quilt sandwich. For my backing I chose a red minky so that the blanket would feel extra soft on sensitive baby skin.


I then used my favorite tool, a Frixion pen, to mark my quilting lines. I chose to use diagonal lines across the squares and straight lines through the stripes. 


After quilting, I applied a black binding and that was it! I was done. This project seemed to go so quickly after the 4 months of hand quilting my dad's quilt.


I cannot wait to give this to the neighbors the next time I see them in the yard! I hope it will be perfect for their new addition!


Happy Quilting!

Saturday, July 13, 2013

Dad's Civil War Quilt


It finally happened this week, I put the last stitch into my dad's Civil War quilt! It was a bit late for his Father's Day gift but, better late than never. This was the quilt that I was creating using blocks from Barbara Brackman's "Civil War Sampler: 50 Quilt Blocks with Stories from History". I didn't make all of the blocks because I wanted some symmetry to the quilt. Instead I chose a few blocks and doubled them (with a few favorites being quadrupled).


A few close ups of some blocks.

I pieced the blocks on my treadle and hand crank sewing machines. I chose not to use any electrical machines so it could be a little more authentic. So when it came time to quilt I decided to take a stab at hand quilting after practicing on some smaller items. I love the look of hand quilting and thought it would complete the look of this quilt. Since there were so many different blocks I wanted a repeated pattern that would tie everything together so I decided to quilt repeating fans across the quilt. The middle panel (featuring Lee and Grant) was the only area of the quilt without fans. I chose to quilt around all of the details of the panel so each detail would stand out!


I finished the hand quilting this past Tuesday evening.

Quilting the last stitch!!!

After all of the quilting, the binding seemed like a breeze. I had the whole quilt completed by Thursday night. I must say, I was even happier with it than I thought I would be. 

Folded over the clothesline

And since it was for my dad, there was love in each and every little stitch.

Back of Quilt

I dropped the quilt off with my dad this weekend and I am pretty sure it will be greatly cherished. Now I will move on to stitch a special baby quilt for my expecting neighbor. A quilter's work is never done!  :)


Happy Quilting!